About Me

- Anita
- I am engaged to Tony, I have 3 children all boys, Steven, Carl and corey. I have been doing PSP for about 7 years on and of now, enjoy making tags. I am now learning how to make scrapkits, templates, masks e.t.c. I have only just started to learn doing all of this, Hope that when I get better at doing all of these I can go on to writing my own tutorials.
Hits
My Time
Contact Me
I would like to see your results
When you have done my tutorials
I would very much like to add them on my blog.....
My TOU
Any resemblence to any other tutorial is purely coincidental. Do not copy, print, rewrite, claim as your own or alter them in any way. If you would like to share them, use the link to this site to direct your friends to the tut's. Absolutely no monetary gain can be aquired from any supplies provided by myself or the scrap designers art, nor any results from my tutorials or their scrap supplies.
Thank you,
Anita....XXXXX
My Tutorials
- Dreams (1)
Some Love
Fav Blogs
- Addictive Pleasures
- Carey's Blog FTU
- Chaotic House Designz
- Crazy Cakes Scraps
- Creationz By WitchysHeart
- Creative Misfits Creations
- Designs By Ali
- Designs By Vaybs
- Designz 2 Sinful
- Divine Intentionz
- Elegant Inspirations
- Eye Candi Graphicz
- Freebie Friends Scraps & More
- Lacarolita's Designz
- Melissaz Creationz
- Pink Princess Scraps
- Pink's Poetic Scraps
- Rieka Rafita
- Rose's Place
- Scraps Dimensions
- Scraps Of Enchantment
- Sixxbug's Creationz
- Soxsational Scraps
- Topcats Tagz
- Toxic Designz
- Twinky Dezines
- Vix PSP
 Sweet Dreams

I am using PSP X but any version will work
Supplies Needed
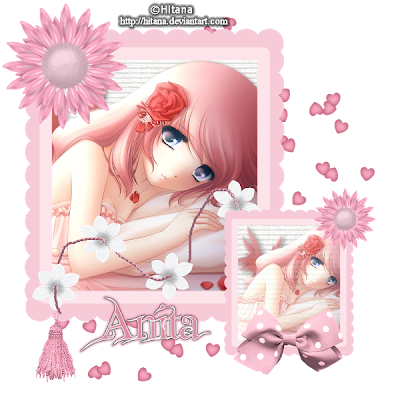
* Scrap Kit used is called "In The Pink" by Topcat Tagz Which you can download from her blog HERE
* Tube of choice, I am using the work of Hitana. It is a FTU Tube which you can download from HERE
*Font Of Choice (I’m using FairyDust)
**************************************
Let’s get Started
1, Open up new image 600 x 600
2, Open element 33, resize to 80%, copy & paste
3, Open paper 6, click inside frame with your magic wand, selections, expand by 3, copy & paste your paper 6, selections, invert, then hit delete, select none, move paper below the frame.
4, Magic wand, click inside frame, modify, expand by 4, copy & paste tube as a new layer, move to position, selections, invert, hit delete, selections, select none,
Add a drop shadow of choice to your tube.
5, Move frame, paper and tube over to the top left slightly
6, Copy & paste frame again but this time resize to 40% place frame bottom right
7, X out the all the other layers, so that all you can see is the small frame, select magic wand, click inside frame expand by 3, copy & paste paper 6, selections, invert, hit delete, selections, select none.
8, Repeat step 4 for your tube again, resize as needed. Add a drop shadow as before.
9, Select the tube in the smaller frame change the opacity to 80
10, Open element 34, resize to 50% copy & paste, then move them under the large frame, position as you like.
11, Open element 8 resize to 50%,
Open element 9 resize to 50% do this twice on element 9,
Open element 11 resize to 50% then place in position, then resize again and place on smaller frame.
Open element 1 resize to 50% place on smaller frame
Add your Artist © and your name, add a gradient glow to both.
That’s it now save your tag
This is only a guide and feel free to use any of the other elements you wish
Most of all have fun
This tutorial was written by Anita on 21st April 2011


